Short-form notes on rebuilding the MooresCloud Holiday Lights from scratch and making the lights work.
This is part 1/3, it covers getting access to the memory card and serial port.
You will need:
- A set of the lights
- #1 Phillips screwdriver
- A strip of 3 0.1″ header pins or socket (cut up a 40-pin strip)
- Soldering iron, solder, and beginner soldering skills (well, maybe not your 1st time soldering, ok?)
- 3.3v TTL serial interface (Something like this CH340G-based one)
- Jumper wires to match your headers pins and serial interface (e.g. Jumper Wires F/F)
- A computer, with a serial terminal (Putty, Screen, Minicom, Cutecom, etc)
Process:
- Follow Kean’s guide to opening the lights
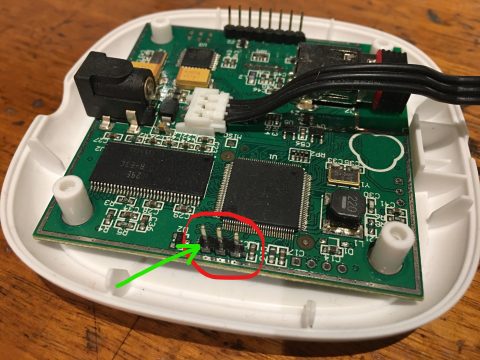
- Solder the 3 header pins into J3, on the ‘bottom’ of the board (same side as the usb port and power plug) so you can still assemble the case with them installed. Make sure you notice which of the solder pads is square – this is pin 1 (hint, the one next to the label J3 on the top, or near D2 on the bottom, see below)
- While you’ve got the iron warm, solder 8 more header pins into J9 on the other edge. These are not required for any of this process, but how can you resist a set of holes labelled “Hack Me!” ??
- Connect the J3 pins to your serial interface, remember:
- Pin 1 rx -> tx
- Pin 2 tx -> rx
- Pin 3 gnd -> gnd
- Start a serial terminal on your computer @ 115200,8N1
- Put the memory card and wifi adapter back into their ports and apply power to the lights (maybe don’t close the case until we’ve made it through to reliably booting the new OS 😉 )
- Watch the boot process scroll through your terminal
That’s all for this step. In part 2 we’ll build a devicetree blob so the linux kernel knows how to use the hardware.